The Steps
parts & labor
what's needed to get the job done
basics of function
overview of how to use the lens and shutter
the back, the strap, the lens
remove useless vintage roll-film parts; lens
the rangefinder
removing, taking apart
cutter-bar & inner parts
more useless vintage parts that have to go
ready the back
cutting; fitting the packfilm back; odds n ends
acquiring a 900 finder
removal & appropriation
fitting the finder & flash
measure, drill & fit
aesthetics
remove & re-leather; paint
adding the back & flash
screws, tape & wires
putting it all together
replace rangefinder, strap, flash & side door
reset infinity
setting the focus stop
completed
admire the work
Basics of Function
While the body of the 110s and the later models may be almost identical, the fact that the 110s use medium format lenses and shutters makes their operation a bit different. Unlike the description here, I am not going to go into details about the finder or the rollfilm back as they are obsolete in this conversion.
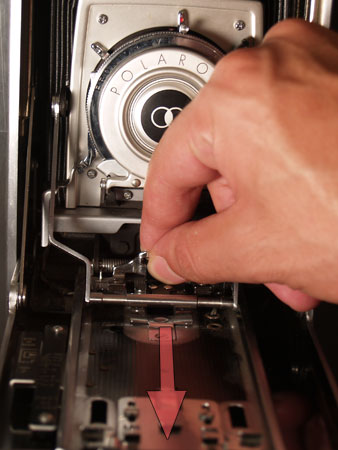
The first step to learning about this camera is to open the front. Push the metal tab on front and the camera will pop out slightly allowing it to be fully opened. It will click and lock when fully opened. Its now rock solid for using the tripod slot on the front by the focus knob.
The lens and bellows can now be pulled out and locked to the focusing rail. Notice the small black tab under the lens, pinch it to unlock and pull it forward.
To close the camera, push down on the strut arms while closing the front.

When extending the bellows, check for any holes, tears or brittleness. Luckily mine is nice and supple, so I luckily won't need to replace them.
You can see the little metal tab next to the focus knob that unfolds to hold the front of the camera up straight while in this position. Nice touch Polaroid.
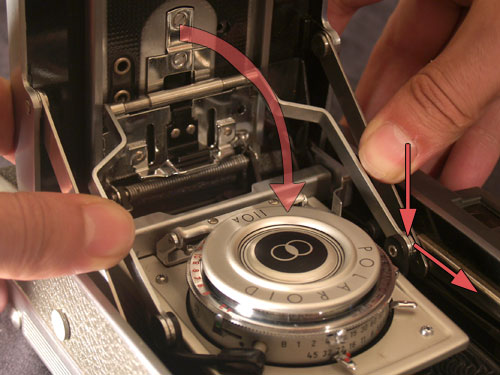
With the camera now fully open we can look at the heart and soul of the 110A, the lens and shutter.
Medium and large format lenses typically come in 2 parts. A lens and a shutter to fit into. On the 110A this is a Rodenstock-Ysarex 127mm in a Prontor SVS shutter.
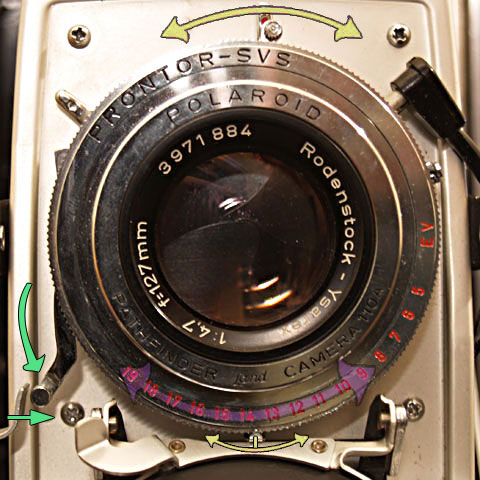
The shutter has 2 rotating rings. The aperture ring is controlled by the red tipped piece up top. When rotated it also moves the EV pointer along the bottom. Yellow arrows.
Rotating the speed ring will also move the red EV values to match the selected f-stop, purple arrow.
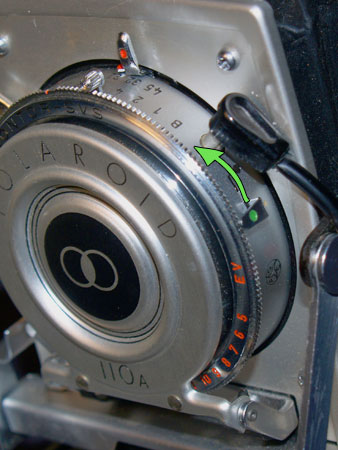
If you want to keep a certain EV locked in, use the small switch along the side.
This will let you keep a proper exposure while allowing you to change the shutter speed accordingly.
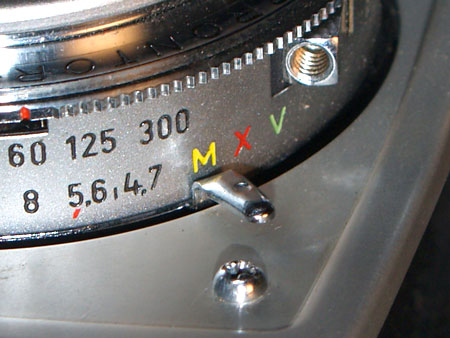
This shutter has a PC flash port for an external flash unit. Along the side of the shutter are M, X, V.
M-sync is for flashbulbs.
X-sync is for electronic flash.
To use the timer, V, the shutter must be cocked first.
If you are attempting this conversion, you had better know what an f-stop is. If you don't, um, maybe you should Google a bit more and come back, don't worry I won't tell..
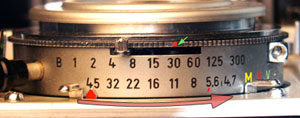
The shutter has speeds from B to 1/300. The tiny red marking on the ring, green arrow, is the current selection. NEVER leave the shutter set to 300, according to the 110A manual this would be bad.
To change apertures from f4.7-45, rotate the red tipped arm so the arrow lines up with the correct f-stop.
Different combinations of speeds and f-stops create different EV numbers. When using a light meter, you can use the EV to set your shutter to the proper exposure. Or, you can wing it.
To cock the shutter pull the arm until it clicks and stops.
To fire the shutter, press the arm on the side of the shutter. For the 110s Polaroid has made an easier to use "button".
The lenscap has a little piece that wont allow the shutter to fire when closed. Nice touch.
Do not leave the shutter cocked while storing the camera. And, again, DO NOT leave the speed set to 300.
That's how you take a photo with the 110A.